
Anatomy of a shell code
by
Abhineet Ayan
abhineet.ayan.verma@gmail.com
ANATOMY OF A SHELLCODE
1. Initialization:
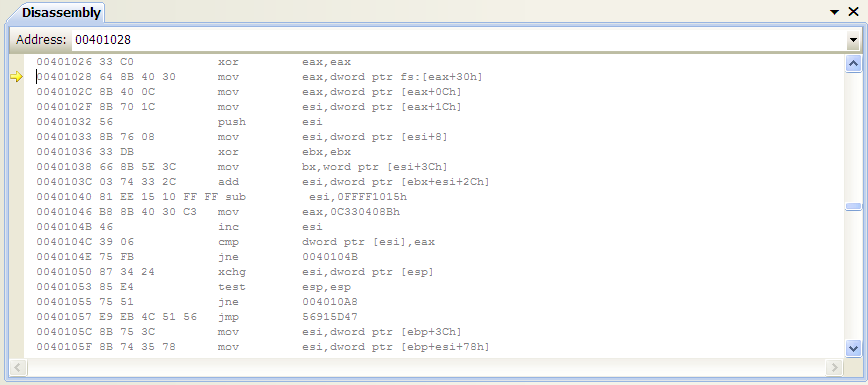
When the Shellcode is loaded in the memory, the first step towards its execution is to know its own address. The process is accomplished using the technique called “Get Program Counter” aka “GetPC”. Fig 1 will show the code involved in this:

Step 1: CALL instruction will push the offset from EIP and will jump to the specified line.
Step 2: POP instruction will pop the offset pushed and will store it to the EAX.
So, now the address is known and saved to EAX.
2. Decryption:
a) The LOOP:
Now after knowing its own address, it will decrypt the whole code to carry out the execution. The code before decryption is just garbage and will not accomplish anything. Let’s have a look at Fig 2:


Step 1: Set the ECX to execute the loop for decrypting the code. Below you can see the value of ECX.


Step 2: XOR each byte by 28h to yield actual data and keep incrementing EAX till ECX reaches 0 to exit the loop successfully.
The Decryption Loop keeps XORing each byte at the specified address with 28H to decrypt it. The loop will be executed the number of times equal to the Value represented in the ECX register.
b) Fig 3 and Fig 4 will show you the encrypted and decrypted line respectively.
Fig 3a: Encrypted Code


Fig 3b: Corresponding Value at Encrypted Byte.


Fig 4a: Decrypted Code.


Fig 4b: Corresponding Value at Decrypted Byte:


c) The full overview of the Encrypted and Decrypted Code with their Memory.
Fig 5: Encrypted Code and its Memory:


Fig 6: Decrypted Code and its Memory:


If you look at the Memory keenly, you can find out the difference and can see that the new Memory actually makes sense.
3. Loading Library Functions:
a) PEB->Ldr:
For shellcode, a common method to resolve the addresses of library functions needed is to get the base address of the kernel32.dll image in memory and retrieve the addresses of GetProcAddress and LoadLibraryA by parsing the kernel32 images Export Address Table (EAT). These two functions can then be used to resolve the remaining functions needed by the shellcode. To retrieve the kernel32.dll base address most shellcodes use the Process Environment Block (PEB) structure to retrieve a list of modules currently loaded in the processes address space. The InInitializationOrder module list pointed to by the PEB's Ldr structure holds a linked list of modules.
The code used to retrieve the kernel32 base address based on this method is shown below in Fig 7:
Step 1: Get a pointer to the PEB.
Step 2: Get PEB->Ldr.
Step 3: Get PEB->Ldr.InInitializationOrderModuleList.Flink (1st Entry). The Memory shown below is after fetching the first entry of PEB->Ldr.InInitializationOrderModuleList.Flink and then NTDLL.DLL(1st Entry).


b) PE-Header of NTDLL:
Fig 8 will show you the code and memory of how the shellcode made its way to the NTDLL’s PE-Header:

The rounded code shows the extraction of the address of the NTDLL’s PE-Header and the Memory shows the PE-Header. The first two bytes of the PE-Header are called as “e_magic” value.
c) Offset of PE-Header:


The above Fig 9 shows the marked code to move the file offset of PE-Header to BX. This Offset is also popularly known as “e_lfanew” value.
d) Bytes Search:
The code block shown below in Fig 10 will search for a string of Bytes saved in register EAX by incrementing the value of ESI till it reaches a particular address where the same string of Bytes represents an instruction.

The above-rounded code of block:
The first instruction will store the string of Bytes in EAX. The ESI will be incremented and compared for each incrementing ESI.
After the successful search, the address for the instruction represented by that string of Bytes will be swapped with the address stored at ESP.


In the Memory window above, the string of Byte is matched at the address shown. Now, the address will be swapped with ESP. The next figure will show the new value at ESP after swapping.


e) Get PEB->Ldr.InInitializationOrderModuleList.Flink (2nd Entry):
After exchanging value from ESP, ESI contains the address for first entry.


Fig 10: The marked code will contain the address for the next link in the .Flink file i.e. link to Kernel32.dll. The marked part of Memory shows the address from where we can extract the DLLs name.
The marked part is the 7th field. Below Fig 11 shows the name of the current DLL:


f) Checking for Kernel32.dll:


Fig 12 shows the code that checks for the “Kernel32.dll” name.
Step 1: Move the address which shows the current DLLs’ name to EBP.
Step 2: Checks for the 12th Byte if equal to digit 3. If equal the execution continues to load libraries.
g) Loading Kernel32.dll PE-Header:
After confirming the address of Kernel32.dll, Fig 13:


Step 1: Move the “Base Address” of Kernel32.dll to EBP. Memory shows the PE-Header of Kernel32.dll.
h) Loading Address of e_lfanew of Kernel32 PE-Header:


The pointed code in Fig 14 shows the loading of “e_lfanew” value in ESI. The Memory shows the “e_lfanew” value. “e_lfanew” contains the offset to the start of the “PE-Header”.
i) Loading the Address of “IMAGE_DATA_DIRECTORY0” from PE-Header of Kernel32.dll:
Fig 15 below will show you the code to obtain the address for “IMAGE_DATA_DIRECTORY0” which is the first entry of the “NumberOfRvaAndSizes”. “NumberOfRvaAndSizes” is the 30th member of _IMAGE_OPTIONAL_HEADER Structure.

Step 1: The offset for “IMAGE_DATA_DIRECTORY0” is loaded in ESI.
Step 2: The actual address is loaded in ESI. (EBP is storing the starting address of PE-Header).
The Memory here shows the address of “IMAGE_DATA_DIRECTORY0”.
*The offset of “IMAGE_DATA_DIRECTORY0” is the RVA of “Export Directory”.
j) Loading The AddressOfNames from the Export Table:
Fig 16:


Step 1: The corresponding code will load the address of 10th member of the “Export Table” i.e.,“AddressOfNames”. The value is the RVA of “Export Name Table(ENT)”.
Step 2: The actual address is obtained.
k) Loading the Names of Functions of Kernel32.dll:
Fig 17: The rounded code will refer to the actual address of the member “AddressOfNames”.
The Memory window shows the loaded Names from Kernel32.dll.


l) The Hashing Loop to search for desired Function Names:
The Hashing Loop:
Each Byte is stored in EDX and then added to EBX. The value at EBX is then rotated right by the value of 0DH. This process is repeated till EAX encounters the NULL i.e., till the code generates the hash for the full Function Name. After creating the hash, this hash value is compared for equality with the value stored at EDI. If the Name hash matches, will exit the loop else will repeat the whole process for the next Function Name.


The Fig 18 is a loop to traverse through the Function Names and search for the desired Function.
Step 1: Move one Byte pointer i.e. the Byte for the first alphabet of the Function Name to EDX. The Memory will show the EAX Byte Pointer Value.

Step 2: Comparing the DL and DH will check if the Byte Pointer value has encountered NULL.
Step 3: If No, continue through Steps 4-7 to fetch the next Byte and creating a hash for the Function
Name to compare it later.
Step 4: The Hashing is carried out at this step.
Step 5: EDX is added to the EBX.
Step 6: EAX is incremented to point towards next Byte.
Step 7: Repeat Step 1-6 till EAX encounters NULL.
Step 8: Compare the hash of Function Name with the stored hash at EDI.

Step 9: If not equal, fetch next Function Hash. If equal, continue with the following code. The created hash is checked for the value stored at EDI. The marked value shows the hash stored for comparison at EDI.


The above Memory shows the desired Function Name searched: LoadLibraryA. The hash created matches the value at EDI.
m) Loading of “AddressOfNameOrdinals”:
Fig :

The rounded code loads the 11th member from the “Export Table” i.e., “AddressOfNameOrdinals”. The value contains the RVA of “Export Ordinal Table (EOT)”.
n) Getting to EAT:
After getting the “AddressOfNameOrdinals”, the below given code block will show the obtaining RVA of “Export Address Table (EAT)”.


The above pointed code will load the effective address of (ESI-14h) to EAX.
Now recall the Bytes string search we did before and stored the address of instruction represented by that Bytes string at ESP.


The above pointed code will call the corresponding instruction. The Memory here shows the instructions’ address.


The highlighted instruction is called by referencing the address stored at ESP. The marked string of Bytes is the Bytes, the code searched for early.
Combining both codes shown in above and previous snapshots yields the final instruction as referencing to the address at “ESI+1CH”.
Below given Fig will show where it is actually pointing to.

The rounded code block will access the address at (ESI-1CH) i.e., the 9th member of the “Export Table”.
The 9th member of this table is “AddressOfFunctions” containing the “RVA of EAT”. Adding this offset with the base address of PE-Header, contained at EBP, will give the address to EAT.


As you can see, the EAX is in VProc_ImageExportDirectory currently.
o) Storing Starting Address Of Desired Functions:

The above shown Fig will obtain the starting address of function which will be stored to the EDI. The figure below will show you the current position of EAX after the execution of this block.


Storing the starting address of function to EDI.


The below two figures will show the whole code responsible for searching of desired function name to storing its starting address at EDI.


The below figure will show you the Memory written at EDI after the whole code loop shown above returns finally.
1st Entry


2nd Entry


3rd Entry


4th Entry


5th Entry


6th Entry


All Entries


The Function Names are: LoadLibraryA, WinExec, TerminateThread, GetTempPathA, VirtualProtect and UrlDownloadToFileA respectively.
4. Self-Registering DLL
a) Regsvr32:
The code block shown below will write “regsvr32 -s” to Memory. Regsvr32 tool (Regsvr32.exe) is used to This command-line tool registers .dll files as command components in the registry. The “-s” option Specifies regsvr32 to run silently and to not display any message boxes.

First Instruction:


Second Instruction:


Third Instruction:


b) Calling “GetTempPathA”:


(ESI+0CH) is the starting address of the function “GetTempPathA”.


c) Writing DLL:
Below given Fig will show the Memory written with DLL name desired to be executed as parameter to regsvr32.exe.


The DLL name is then renamed. Below figure will show the renamed DLL with its path:


d) Calling “UrlDownloadToFileA”:

The marked code will call the address stored at (ESI+14H) i.e., the 6th function name entry, “UrlDownloadToFIleA”.


e) Calling “TerminateThread”:


The pointed code calls the address stored at (ESI+8) i.e., the 3rd function name entry, “TerminateThread”. The function will exit the native code.


No comments:
Post a Comment